Rust 03. Variables, Types, Control Flow, and Functions
When you first learn Rust, the most important syntax to understand is variables, types, control flow, and functions. Once these four are clear, later topics such as struct, enum, ownership, and borrowing become much easier to follow. This post walks through each topic one by one and includes small examples you can run right away.
Create a Practice Project
You can create a new Cargo project like this and run the examples in src/main.rs.
cargo new rust-basic-syntax
cd rust-basic-syntax
code .
After pasting an example into src/main.rs, run it with:
cargo run
Variables
In Rust, variables are immutable by default. That means a value declared with let cannot be assigned again unless you explicitly make it mutable with let mut.
The example below shows an immutable variable, a mutable variable, and shadowing in one place.
fn main() {
    let count = 10;
    println!("count = {}", count);

    let mut level = 1;
    level = level + 1;
    println!("level = {}", level);

    let spaces = "   ";
    let spaces = spaces.len();
    println!("spaces length = {}", spaces);
}
The main points are:
countis declared withlet, so it cannot be changed.levelis declared withlet mut, so it can be updated.spacesdemonstrates shadowing, where a new variable with the same name replaces the earlier one.
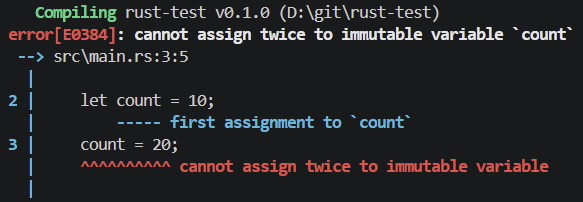
For example, if you try to assign a new value to a variable declared with let, you get a compile error.
fn main() {
    let count = 10;
    count = 20;
}
In this case, Rust reports that count is immutable and cannot be assigned again.
If you want to change the value, you need to declare it with mut like this.
fn main() {
let mut count = 10;
count = 20;
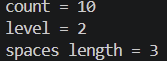
println!("count = {}", count);
}
The output looks like this.
Shadowing is different from mut. With mut, you update the same variable. With shadowing, you create a new variable with the same name. Because of that, shadowing can also be used to change the type associated with a name.
Types
Rust has strong type inference, so you often do not need to write types explicitly. Still, it helps to see the main beginner-level types in one place before moving on. A compact summary looks like this.
| Category | Types | Description |
|---|---|---|
| Signed integers | i8, i16, i32, i64, i128, isize |
Integer types that can store both negative and positive values. i32 is the one you will usually see first. |
| Unsigned integers | u8, u16, u32, u64, u128, usize |
Integer types that store only zero or positive values. usize often appears in indexing. |
| Floating-point numbers | f32, f64 |
Types for decimal numbers. f64 is the more common default choice. |
| Boolean | bool |
Holds either true or false. |
| Character | char |
Stores a single character written with single quotes. |
| String slice | &str |
An immutable string reference. String literals use this type. |
| String | String |
An owned string type that can grow and be modified. |
| Tuple | (T1, T2, ...) |
Groups multiple values together and can mix different types. |
| Array | [T; N] |
Stores values of the same type with a fixed length. |
Instead of trying to memorize everything at once, it is more practical to start with the types you use most often.
fn main() {
let age: i32 = 29;
let temperature: f64 = 36.5;
let is_rust_fun: bool = true;
let grade: char = 'A';
let language: &str = "Rust";
let message: String = String::from("hello");
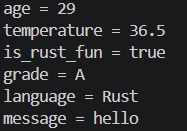
println!("age = {}", age);
println!("temperature = {}", temperature);
println!("is_rust_fun = {}", is_rust_fun);
println!("grade = {}", grade);
println!("language = {}", language);
println!("message = {}", message);
}
The output looks like this.
In that example, the most commonly used types are:
i32: a very common starting point for integer examplesf64: commonly used for floating-point valuesbool: used constantly with conditionschar: used for a single character&str: the type you see most often with string literalsString: used when you need an owned string
Tuple and array are also basic types, but for a first pass it is enough to get comfortable with the types above. Tuple and array appear again later in the combined example in this post.
A classic example of why explicit typing matters is string parsing.
fn main() {
    let guess: i32 = "42".parse().expect("A number is required.");
    println!("guess = {}", guess);
}
The output looks like this.
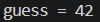
From parse() alone, the compiler cannot know which numeric type you want. Writing guess: i32 gives the compiler the exact target type.
Control Flow
Control flow determines the order in which your program runs. In Rust, the most common forms are if, loop, while, for, and match.
if
Use if when you want to run different code depending on a condition.
fn main() {
    let number = 7;

    if number % 2 == 0 {
        println!("It is even.");
    } else {
        println!("It is odd.");
    }
}
The output looks like this.

In Rust, the condition in if must always be a bool. Unlike some other languages, you cannot place a number directly in the condition.
if can also be used as an expression.
fn main() {
    let score = 85;
    let result = if score >= 80 { "pass" } else { "retry" };

    println!("result = {}", result);
}
The output looks like this.

loop
loop repeats forever until it reaches break.
fn main() {
    let mut count = 0;

    let result = loop {
        count += 1;

        if count == 3 {
            break count * 10;
        }
    };

    println!("result = {}", result);
}
The output looks like this.

One nice Rust feature is that loop can return a value through break. In this example, 30 is stored in result.
while
Use while when repetition should continue only as long as a condition is true.
fn main() {
    let mut remaining = 3;

    while remaining > 0 {
        println!("remaining = {}", remaining);
        remaining -= 1;
    }

    println!("start");
}
The output looks like this.
while reads well when the condition naturally becomes false as the loop progresses.
for
for is the most common way to iterate over arrays, vectors, ranges, and other iterable values.
fn main() {
    let tools = ["rustc", "cargo", "clippy"];

    for tool in tools {
        println!("tool = {}", tool);
    }

    for number in 1..=3 {
        println!("number = {}", number);
    }
}
The output looks like this.
In real Rust code, for is usually preferred over manual counting with while, especially when iterating over a collection.
match
When you want clearer branching, match appears very often in Rust code.
fn main() {
    let score = 85;

    let grade = match score {
        90..=100 => "A",
        80..=89 => "B",
        70..=79 => "C",
        _ => "D",
    };

    println!("grade = {}", grade);
}
The output looks like this.

match is powerful because it encourages you to handle every possible case. In many situations, that makes it safer and easier to read than a long if/else if chain.
Functions
Functions are the basic unit for grouping repeated logic and separating inputs from outputs. In Rust, you define a function with the fn keyword.
fn print_user(name: &str, age: u32) {
    println!("name = {}, age = {}", name, age);
}

fn add(a: i32, b: i32) -> i32 {
    a + b
}

fn max(a: i32, b: i32) -> i32 {
    if a > b {
        a
    } else {
        b
    }
}

fn main() {
    print_user("K4NUL", 30);

    let sum = add(10, 20);
    let bigger = max(7, 11);

    println!("sum = {}", sum);
    println!("bigger = {}", bigger);
}
The output looks like this.
Important details here are:
print_userdoes not explicitly declare a return type, so it returns().addandmaxexplicitly declare their return type with-> i32.- In Rust, if the last line of a block has no semicolon, that value becomes the return value.
Semicolons matter in Rust. If you add a semicolon to the final expression, it becomes a statement instead of a returned value, which can cause a type error.
fn add(a: i32, b: i32) -> i32 {
    a + b;
}
In that case, the last line is treated as () instead of i32, so it no longer matches the function’s declared return type and results in a compile error.
In other words, if a function should return a value, it is important not to add a semicolon to the final expression.
Combined Example
Here is one example that combines everything covered so far.
fn describe_score(score: i32) -> &'static str {
    match score {
        90..=100 => "excellent",
        80..=89 => "good",
        70..=79 => "not bad",
        _ => "keep practicing",
    }
}

fn add(a: i32, b: i32) -> i32 {
    a + b
}

fn main() {
    let user = "rust beginner";
    let mut score = 70;
    score = score + 15;

    let level = if score >= 80 { "intermediate" } else { "starter" };

    let point: (i32, i32) = (10, 20);
    let numbers: [i32; 3] = [1, 2, 3];

    println!("user = {}", user);
    println!("score = {}", score);
    println!("level = {}", level);
    println!("point = ({}, {})", point.0, point.1);

    for number in numbers {
        println!("number = {}", number);
    }

    let mut countdown = 3;
    while countdown > 0 {
        println!("countdown = {}", countdown);
        countdown -= 1;
    }

    let total = add(10, 20);
    println!("total = {}", total);
    println!("description = {}", describe_score(score));
}
This single example includes variables, types, if, while, for, match, function definitions, and return values. A practical way to study it is to run each section separately first and then run the combined example at the end.
Summary
This post covered the basics of variables, types, control flow, and functions in Rust. Once you understand the difference between let and let mut, common built-in types, the role of if/loop/while/for/match, and how function parameters and return values work, learning the next Rust topics becomes much easier.
A good next step is to move on to ownership, borrowing, and references, which explain how Rust achieves memory safety without giving up performance.
댓글남기기